During the really cold winter days, I decided to update our home heating system. You can read about that in another article. The result was a setup consisting of some scripts and automations in Home Assistant, an EMS Bus Gateway to talk to the boiler, and radiator knobs by tado°.
good bye tado
It turned out that the whole tado infrastructure was pretty unreliable when it came to communicating to Home Assistant. This is no report on its general functionality - I am aware that my setup was pretty unusual compared to the intended use case of the tado system. But, I experienced a lot of signal losses between tado and Home Assistant rendering it useless for scheduled automations. The knobs, for example, were very often unreachable for Home Assistant at the exact moment when an automation was triggered. That required a lot of digging and debugging which was annoying.
In the end, we decided to ditch the tado hardware.
hello ZigBee
The new setup builds on ZigBee. It is a standard for wireless networks connection battery-powered devices. And it is used to talk to the radiator knobs and some temperature sensors.
The setup now consists of
- SONOFF Zigbee 3.0 USB Dongle-E
- Hama Heizkörperthermostat 176592
- SONOFF SNZB-02 Temperature & Humidity Sensor (just a few)
This is just the controlling-the-radiators-part. Speaking to the boiler is still managed by the EMS Bus Gateway as it is described here.
the ZigBee dongle
ZigBee doesn't work with your WiFi chip, so you probably need a new piece of hardware - in my case a USB-dongle. After trying out another dongle, I ended up using the SONOFF Zigbee 3.0 USB Dongle-E which works like a charm on my Raspberry Pi 4. Make sure to buy the ZBDongle-E version instead of the ZBDongle-P. According to this thread, the E indicates the updated hardware while the old version of the hardware is sold as the P-version.
Just as a side note: I didn't try out the P-version before, but the Phoscon ConBee II. That didn't work well on the RPi4 with Home Assistant.
the knobs
Then, you need some radiator knobs that also talk ZigBee. After consulting this database, I decided to go with the Hama Heizkörperthermostat 176592. If you want to order them, be quick, because the official website says they're out of stock. Maybe, they aren't produced anymore...
To make the knobs report their temperature correctly, you need to integrate a local quirk to Home Assistant. Make sure to check out the next section about preparations.
temperature sensors
The knobs ship with a temperature sensor. But, some of them are hidden badly behind a sofa or a bed. So they can't measure the room temperature correctly and turn off way before the room is warm. That's why I added in some SONOFF SNZB-02 temperature sensors. They talk ZigBee and do their job well.
preparations
In Home Assistant, I use the ZHA integration. That controls the USB dongle, sets up the network, and so on. As of March 2023, this integration needs some extension to talk to the Hama knobs correctly. Without that, you can't read the room temperature and it won't let you set a new temperature from within HA.
Somewhere down this github ticket, I discovered this github repo, and cloned it to home-assistant-directory/config/zha_quirks. Then, just following another github ticket, I added this to my config/configuration.yaml:
zha:
  custom_quirks_path: /config/zha_quirks
(I'm using HA in a docker container, hence the absolute path...)
Luckily, that just works. I didn't want to dig deeper here. :-)
scripts and automations
In the process of updating the hardware, I decided to update the YAML scripts as well because why not.
interface and helpers
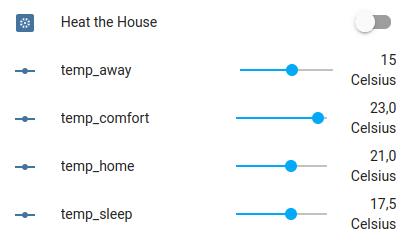
As in the previous iteration, my setup still builds on a toggle switch for "Heating the House" and four temperature levels: away, sleep, home, and comfort. In HA, these are just input_numbers. These helpers are accessible via a UI:

My helpers in Home Assistant. The switch controls heating and the sliders let me adjust temperature settings for temperature levels
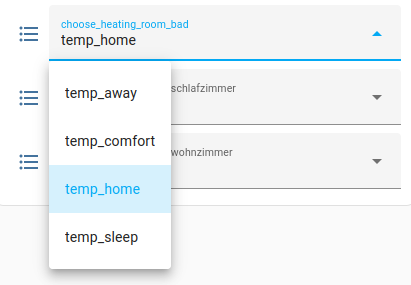
Then, there is a card that allows me to select the temperature level in each room. It is an input_select for each room that has the four temperature levels as choices.

Another helper in Home Assistant to choose a temperature level for each room.
Apart from that, a hidden helper is required: An input_boolean called toggle_thermostat_script_success. That stores successful execution of a script for the calling automation to react to failure.
If you like, you can define another switch called working_at_home. I turn this on when I work from home and don't want to freeze in my chair.
adjusting the knobs
In the old setup, I complained about the lack of abstraction in the script. This is now a little different.
There is a script that adjusts the radiator knobs. It opens them once the measured temperature is lower than the target temperature. Once the target temperature is reached, the knobs are turned into an auto-mode.
alias: Check Heating generic
mode: single
description: >-
  Adjust radiator knobs in case room sensors report low temperatures for a given
  room
variables:
  sleep_temp: "{{states('input_number.temp_sleep')|float}}"
  away_temp: "{{states('input_number.temp_away')|float}}"
  home_temp: "{{states('input_number.temp_home')|float}}"
  comf_temp: "{{states('input_number.temp_comfort')|float}}"
sequence:
  - repeat:
      count: "{{ the_rooms | count }}"
      sequence:
        - variables:
            i: "{{repeat.index - 1 | int }}"
            the_knob: "{{ the_rooms[i]['the_knob'] }}"
            the_sensor: "{{ the_rooms[i]['the_sensor'] }}"
            the_state: "{{ the_rooms[i]['the_state'] }}"
            room_sensor: |
              {% if the_sensor.startswith('sensor') %}
                {{ states(the_sensor)|float(1337) }}
              {% else %}
                {{ state_attr(the_sensor, 'current_temperature')|float(1337) }}
              {% endif %}
            room_set_temp: "{{state_attr(the_knob, 'temperature')|float(0)}}"
            use_state: |
              {% if 'the_special_state' in the_rooms[i] %}
                {% if is_state(the_rooms[i]['check_use_special_state'],'on') %}
                  {{the_rooms[i]['the_special_state']}}
                {% else %}
                  {{the_state}}
                {% endif %}
              {% else %}
                {{the_state}}
              {% endif %}
            room_chosen_temp: |
              {% if is_state(use_state, 'temp_away') %}
                {{away_temp}}
              {% elif is_state(use_state, 'temp_home') %}
                {{home_temp}}
              {% elif is_state(use_state, 'temp_sleep') %}
                {{sleep_temp}}
              {% elif is_state(use_state, 'temp_comfort') %}
                {{comf_temp}}
              {% endif %}
            room_target_temp: |
              {% if 'the_special_state' in the_rooms[i] %}
                {% if is_state(the_rooms[i]['check_use_special_state'],'off') %}
                  {{ [sleep_temp, room_chosen_temp] | min}}
                {% else %}
                  {{room_chosen_temp}}
                {% endif %}
              {% else %}
                {% if is_state('input_boolean.heat_the_house','off') %}
                  {{ [sleep_temp, room_chosen_temp] | min}}
                {% else %}
                  {{room_chosen_temp}}
                {% endif %}
              {% endif %}
            room_diff_temp: >
              {% if room_sensor == 1337 %} 0 {%else%} {{room_target_temp -
              room_sensor | float(0)}} {%endif%}
        - choose:
            - conditions: "{{ room_diff_temp > 0 }}"
              sequence:
                - service: climate.set_temperature
                  data:
                    hvac_mode: heat
                    temperature: >-
                      {{ [room_set_temp + room_diff_temp + 1, room_chosen_temp +
                      room_diff_temp + 1] | max}}
                  data_template:
                    entity_id: "{{the_knob}}"
          default:
            - service: climate.set_temperature
              data:
                hvac_mode: auto
                temperature: "{{room_target_temp}}"
              data_template:
                entity_id: "{{the_knob}}"
  - service: input_boolean.turn_on
    data: {}
    target:
      entity_id: input_boolean.toggle_thermostat_script_success
Let's have a look at the details. First, we want to ignore the the_rooms-variable. The script has the_knob, the_sensor, and the_state. The room_sensor-variable contains the sensor reading from the given temperature sensor. The if-switch checks whether the the_sensor is a Sonoff sensor or a knob's sensor. The Sonoff sensors show up as sensor.name_of_the_sensor in HA while the knob-sensors appear as a value among the climate.name_of_the_thermostat entries. Both sensor readings need to be obtained slightly differently.
The room_set_temp contains the current temperature that is set on the knob. In use_state the current temperature level is looked up that is set in the corresponding drop-down menu in the UI (see above). Let's ignore the_special_state as well for now.
The room_target_temp stores the target temperature. That is pre-determined by the temperature level in use_state when the above-mentioned switch "Heat the House" is on. Otherwise, either lowest value of the sleep temperature level or the use_state level is chosen. Again, let's ignore the_special_state here.
In room_diff_temp, we keep the difference between room_set_temp and room_target_temp - at least when all the sensor readings were successful.
If there is a temperature difference that needs to be eliminated, the knob is opened. Otherwise, it is set to room_target_temp and left alone. Other than the tado knobs, the Hama things are a little less smart. If you set the temperature to a certain value, the knob seems to open the valve to a corresponding fraction. However, heating up a room with that takes ages. That's why the script sets the temperature higher than required to boost the heating process: it sets the value to the maximum of [room_set_temp + room_diff_temp + 1, room_chosen_temp + room_diff_temp + 1].
This procedure is repeated for all rooms in the_room-list. That list comes from the automation that calls this script:
alias: Check Heating
description: ""
trigger:
  - platform: time_pattern
    minutes: /2
condition: []
action:
  - service: input_boolean.turn_off
    data: {}
    target:
      entity_id: input_boolean.toggle_thermostat_script_success
  - repeat:
      while:
        - condition: state
          entity_id: input_boolean.toggle_thermostat_script_success
          state: "off"
      sequence:
        - service: script.check_heating_generic
          data:
            the_rooms: "{{ the_rooms }}"
        - delay:
            hours: 0
            minutes: 0
            seconds: 30
            milliseconds: 0
variables:
  the_rooms:
    - the_sensor: sensor.sonoff_sleep_temperature
      the_knob: climate.sleep_thermostat
      the_state: input_select.choose_heating_room_schlafzimmer
    - the_sensor: climate.bad_thermostat
      the_knob: climate.bad_thermostat
      the_state: input_select.choose_heating_room_bad
    - the_sensor: climate.office_thermostat
      the_knob: climate.office_thermostat
      the_state: input_select.choose_heating_room_office
      the_special_state: input_select.choose_heating_room_office_working
      check_use_special_state: input_boolean.working_home
mode: single
Here you can see how the_rooms is defined: it is a list of rooms and all of them contain the name of the sensor, the name of the knob, and the name of the input_select by which the room temperature level is set. This setup is pretty flexible: when you want to activate or remove a dedicated temperature sensor for a room, you need to adjust it here only once for the corresponding room. The script can remain untouched. Also, you could imagine having multiple automations checking a subset of rooms.
One comment on the_special_state. For the home office, I have defined two input_select entries in the helper above. If I work from home, I want the home office to be warmer than the rest of the time. Also there are times when I work from home and everybody else is out. In that cases, only the home office should be heated. To trigger that, there is another toggle switch called input_boolean.working_home. So, if that is activated, only the home office is heated up and all other rooms remain cold.
firing up the boiler
In essence, firing up the boiler still works like before. It was updated such that determining if firing up the boiler is necessary is now a little more elegant. The script looks like this:
alias: Heizung Toggle Boiler
mode: single
description: Turn on Boiler if coolest room temperature below max set
variables:
  target_temp: |
    {% set ns = namespace(the_max=-1337) %}
    {% for room in the_rooms %}
      {% set ns.the_max = max( ns.the_max, state_attr(room.temp_target, 'temperature') | float(-1337) ) %}
    {% endfor %}
    {{ ns.the_max }}
  min_temp: |
    {% set ns = namespace(the_min=1337) %}
    {% for room in the_rooms %}
      {% set ns.the_min = min( ns.the_min, state_attr(room.temp_target, 'current_temperature') | float(1337) ) %}
    {% endfor %}
    {{ ns.the_min }}
  min_sensor: |
    {{ states(the_rooms[1].temp_current) | float(1337) }}
  temp_difference: "{{ '%0.2f' % (min_temp - target_temp) }}"
  temp_offset: "{{ max( -5.0, min([temp_difference , 0.0])) }}"
  heating_required: |
    {% set ns = namespace(required=0) %}
    {% for room in the_rooms %}
      {% if room.temp_current.startswith('climate') %}
        {% if state_attr(room.temp_current, 'current_temperature') | float(1337) < state_attr(room.temp_target, 'temperature') | float(-1337) %}
          {% set ns.required=true %}
        {% endif %}
      {% elif room.temp_current.startswith('sensor') %}
        {% if states(room.temp_current) | float(1337) < state_attr(room.temp_target, 'temperature') | float(-1337) %}
          {% set ns.required=true %}
        {% endif %}
      {% endif %}
    {% endfor %}
    {{ ns.required | bool }}
  water_state: |
    {% if is_state('input_boolean.all_at_home','off') %}
      'off'
    {% elif is_state('input_boolean.heat_the_house','on') %}
      'on'
    {% else %}
      'auto'
    {% endif %}
sequence:
  - service: mqtt.publish
    data:
      topic: ems-esp/thermostat
      payload_template: "{\"cmd\":\"intoffset\", \"data\":0.0}"
      qos: 0
      retain: false
  - delay:
      seconds: 1
  - choose:
      - conditions: "{{heating_required}}"
        sequence:
          - service: mqtt.publish
            data:
              topic: ems-esp/thermostat
              payload_template: "{\"cmd\":\"intoffset\", \"data\":{{ temp_offset }}}"
          - delay:
              seconds: 1
          - service: mqtt.publish
            data:
              topic: ems-esp/thermostat
              payload_template: "{\"cmd\":\"seltemp\", \"data\":{{ target_temp }}}"
          - delay:
              seconds: 1
          - service: mqtt.publish
            data:
              topic: ems-esp/thermostat
              payload_template: "{\"cmd\":\"daytemp\", \"data\":{{ target_temp }}}"
          - delay:
              seconds: 1
          - service: mqtt.publish
            data:
              topic: ems-esp/thermostat
              payload: "{\"cmd\": \"mode\", \"data\": \"day\"}"
              qos: 0
              retain: false
      - conditions:
          - condition: state
            entity_id: input_boolean.all_at_home
            state: "off"
        sequence:
          - service: mqtt.publish
            data:
              topic: ems-esp/thermostat
              payload: "{\"cmd\": \"mode\", \"data\": \"night\"}"
              qos: 0
              retain: false
          - delay:
              seconds: 1
          - service: mqtt.publish
            data:
              topic: ems-esp/thermostat
              payload_template: "{\"cmd\":\"seltemp\", \"data\":{{ away_temp }}}"
          - delay:
              seconds: 1
          - service: mqtt.publish
            data:
              topic: ems-esp/thermostat
              payload_template: "{\"cmd\":\"nighttemp\", \"data\":{{ away_temp }}}"
      - conditions:
          - condition: or
            conditions:
              - condition: state
                entity_id: input_boolean.working_home
                state: "on"
              - condition: state
                entity_id: input_boolean.heat_the_house
                state: "on"
        sequence:
          - service: mqtt.publish
            data:
              topic: ems-esp/thermostat
              payload: "{\"cmd\": \"mode\", \"data\": \"day\"}"
              qos: 0
              retain: false
          - delay:
              seconds: 1
          - service: mqtt.publish
            data:
              topic: ems-esp/thermostat
              payload_template: "{\"cmd\":\"seltemp\", \"data\":{{ home_temp }}}"
          - delay:
              seconds: 1
          - service: mqtt.publish
            data:
              topic: ems-esp/thermostat
              payload_template: "{\"cmd\":\"daytemp\", \"data\":{{ home_temp }}}"
    default:
      - service: mqtt.publish
        data:
          topic: ems-esp/thermostat
          payload: "{\"cmd\": \"mode\", \"data\": \"night\"}"
          qos: 0
          retain: false
      - delay:
          seconds: 1
      - service: mqtt.publish
        data:
          topic: ems-esp/thermostat
          payload_template: "{\"cmd\":\"seltemp\", \"data\":{{ sleep_temp }}}"
      - delay:
          seconds: 1
      - service: mqtt.publish
        data:
          topic: ems-esp/thermostat
          payload_template: "{\"cmd\":\"nighttemp\", \"data\":{{ sleep_temp }}}"
  - service: mqtt.publish
    data:
      topic: ems-esp/thermostat
      payload_template: "{\"cmd\":\"wwmode\", \"data\":{{water_state}}}"
  - delay:
      seconds: 1
  - service: mqtt.publish
    data:
      topic: ems-esp/thermostat
      payload_template: "{\"cmd\":\"wwcircmode\", \"data\":{{water_state}}}"
As you can see, this script builds on a similar list called the_rooms just like the other script before. It determines all target temperatures as well as all measured temperatures for each room in the_rooms and checks whether a room needs heating ( heating_required ).
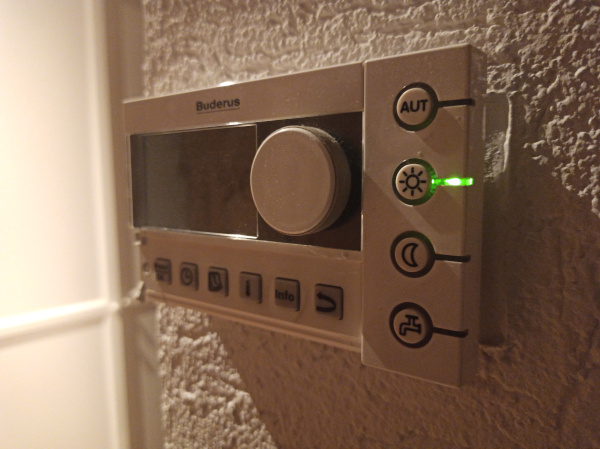
If heating is required, the good ol' thermostat is tricked into thinking that it measures a lower temperature than it actually does by tinkering with its internal temperature offset. It is then smart enough to activate the boiler on its own.

The good ol' dusty Buderus RC35 thermostat.
The rest of the script is just checking if we are at home ( all_at_home) and the boiler should be fired up at all, or if heating is activated through the heat_the_house- or working_home-switches. If the switches are on, heating is triggered. Else, a default temperature level is set and the thermostat is put into night-mode (that comes from the thermostat itself and is not defined within HA).
In the end, the hot water is also controlled and either turned on, off, or put into an auto-mode according to the heat_the_house- and all_at_home-switches.
The automation triggering this script is fairly simple. It contains a list the_rooms as well, but this one looks much simpler. It just carries around the places where to obtain the current and the target temperature.
alias: Trigger Boiler
description: ""
trigger:
  - platform: time_pattern
    minutes: /1
condition: []
action:
  - service: script.boiler_turn_on
    data:
      the_rooms: "{{the_rooms}}"
variables:
  the_rooms:
    - temp_target: climate.office_thermostat
      temp_current: climate.office_thermostat
    - temp_target: climate.sleep_thermostat
      temp_current: sensor.sonoff_sleep_temperature
    - temp_target: climate.bad_thermostat
      temp_current: climate.bad_thermostat
mode: single
Wrap Up
That's it. A smart home heating system that works 100% locally without any external services. It is fairly simple to set up by having only one switch that triggers heating the house and a temperature level to be chosen for each room.
The switch can be triggered from another automation, based on some schedule, or based on calendar entries. Both the radiators and the boiler react to it accordingly. No additional script calls are required since the automations check for the switch each time they're executed.
drawbacks
A downside to this setup is the fact that a room temperature can't be adjusted manually through the knobs anymore. That will be overriden by the script checking the knob settings every X minutes...
So, to change a room temperature, you need to open HA and change the temperature level for the room:

The only way to change a temperature level for a room.
But, you know, one has to die a death of some kind...